It is not very hard to solder, but if you have a steady hand, a magnifier glass and strong light, it is of great help.
This is the first project for me where I use SMD-components, and with the size of the SMD components that I use, it is actually as fast or faster to solder compared to the old fashion through hole soldering.
Here is an excellent SMD soldering tutorial from the user lizerdboy79 at Youtube, https://www.youtube.com/watch?v=PxeWVCS15RU
When you receive your kit you first need to make sure all components are there.
Things you will need is,
- Soldering station
- Solder tin
- Flux
- Side cutter
Good to have,
- Tweezers (to place components)
- Magnifier
- Strong light
You start to solder the components that build the lowest height from the PCB. That is the resistors, capacitor and LED. The orientation of the resistors and capacitor is not important. The resistors however must have the black side up.
The LED must be soldered with the right orientation. The bottom side of the LED has an arrow. This arrow should point to the (-)-marking on the PCB where the LED should be soldered.
 |
| Bottom side of the SMD LED |
 |
| Marking on the PCB is the Cathode. The LED also has a green spot on the top that marks the location of the Cathode. |
Start with cleaning the soldering pads on the PCB where the components will go. Then put some solder on one of the soldering pads for each component.
Take one component with the Tweezers and place it on the PCB. Pre-heat the pad where you put the soldering tin, and push in the component into the melted tin. Be quick. Remove the soldering tip. Let cool, and release the tweezers.
Once this is done, you can go ahead and solder the other side of the component.
Repeat for the rest of the SMD resistors, capacitor and LED component.
R1 - 1k
R2, R3 - 4k7
R4 - 4k7 (This resistor is optional. In the kit I have provided a 3-pin-header and a jumper instead)
Next is the mini USB type B connector (If you will use it).

You must solder the power-pins. Some USB power supplies automatically shut down if they do not sense any load between the data-pins (D+ and D-). This can be overcome by putting a solder blob between pin 2 and 3.
Add some flux to all the soldering pads.
Put some solder on one of the chassi pads.
Press the connector in place and apply heat to the soldering pad where you added the tin.
You should notice that the component sinks into place.
Solder the rest of the 3 chassi pads.
Last you solder pin 1 and pin 5 of the usb connector. They represent Vcc and GND.
If you want you can put a tin blob shortening pin 2 and 3. This will make sure that you can use any USB-charger to power the Wireless Multi-sensor.
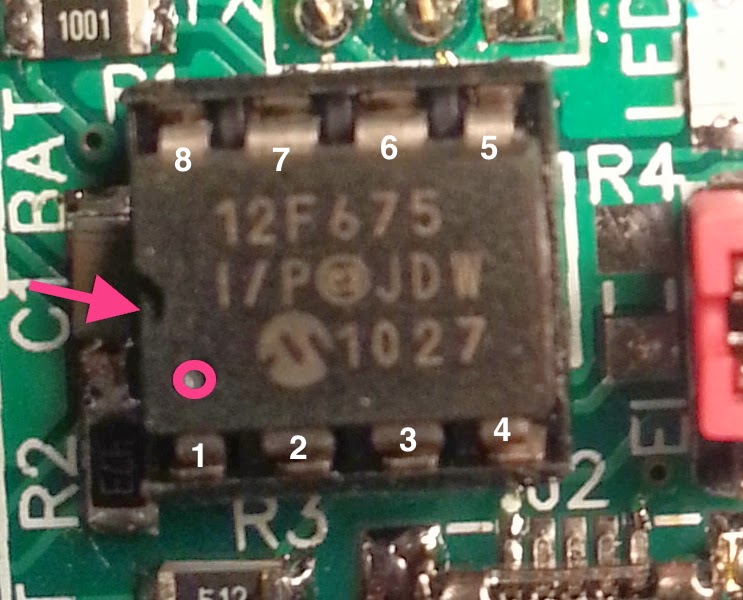
Next up is the DIP 8 IC socket for the PIC12F675 microcontroller.

The orientation of the socket is not as important as the PIC12F675 orientation. However, there is a marking in the PCB that corresponds to the marking in the DIP-socket. Orient it accordingly. The red ring marks where pin 1 on the PIC12F675 goes.
Add some flux.
Place the DIP-socket in place and turn the PCB upside down.
Solder two of the pins in opposite corners. Pin 1 and 5 for instance.
Pick up the PCB and apply pressure on the DIP-socket and heat the pins where you soldered one at the time.
You should feel the socket sinks into place.
Solder the rest of the pins.
Place the PIC12F675 into the DIP-socket oriented as in the picture below.
The last thing to solder is the 3-pin header in the EI position (EI = Event Input).
Put the pin header in place and turn the PCB on the back and solder one pin.
At this point the pin header is probably not very straight positioned. Pick the PCB up and put one of your fingers on top of the pin header while you heat the pin you just soldered.
Make the pin header straight and let cool. Lay the PCB down again on the back, and solder the remaining pins. Once you have soldered all pins you can install the mini jumper, shortening the two pins closest to the LED. This makes sure that the Input pin is pulled to ground when it is not in use. If you forget this jumper and leave the pin header open, you will get sporadic PIR-events.
Continue read about how you mount the additional sensors in another blogpost.
No comments:
Post a Comment